A Desk from a foot board…

One of my friends sent me a text in November asking if I could build anything from some full-sized foot boards being thrown out.  Apparently her cousin had just purchased a second home in this area and it came with a bunch of furniture but not a desk…which is what we settled on.  Not only was she throwing out two foot boards, but also some wooden slats and bed rails.  So I took all of it so I could save supply costs.

Unfortunately the holidays got in the way and it took me a while to get to this project.  Luckily my client was patient and understanding of my limitations.  It also took me a while to formulate in my head how I wanted to do this.

  1. Unscrew the round toppers
  2. Cut one foot board in thirds, discarding the center section
  3. Remove the legs from the slats and screw two sets of two together and remove the other two screws completely
  4. Use these pieces to attach the sides to the back (using drywall screws)
  5. Cut parts of the wooden slats it 45 degree angles to attach the sides to the back and add security. I’m annoyed I don’t have the right picture for this. The picture shown has these pieces attached to the boom on the desk when in fact they ended up being an inside mount.
  6. Cut more of the slats and set on top of the two side pieces which also connected the back and the sides.
  7. Disassemble the railings (as they had an extra piece attached at a 45 degree angle).  This part annoyed me because they were screwed together AND glued.  I had to unscrew the cut at the seam with a circle saw and pry apart.
  8. Cut the ends off the railings
  9. Cut those railings to an appropriate length for the top
  10. Screw those railings down using drywall screw, counter-sunk
  11. Purchase a wooden trim and attached with finishing nails

Once together, I sealed all the gaps and holes with paint-able silicone caulk.  Then I went to paint.

In order to save my client money, I mixed my own chalk paint and some wax too.  I mixed Plaster of Paris, water and white latex paint to create my chalk paint.  You can find “recipes” on Pinterest.I applied the paint in smooth strokes with a brush.

I sanded out any rough spots and tried to distress the piece a bit.  It was a bit challenging because a lot of the wood was covered in veneer.  But I was able to distress a bit.

I also purchased regular finishing wax, rather than soft wax (half the price) and simply melted it by placing it in a glass jar then holding it in boiling water until melted.  This caused it to apply smoothly.  This I applied in a circular motion then wiped it off with a clean cloth with the grain.

For the trim, I mixed some brown paint with the hot, melted wax then rubbed it on and removed excess with a clean cloth.

I think my first paying client likes it and it looks perfect in her space 🙂

Until next time,

signature


Nerf Birthday Party…

One of my favorite friends in the whole world has this really cool kid.  She, like all mothers, wants to always give her son everything he wants and needs.  But since she is a single mom, she also needs to do so on a budget.  For her son’s last birthday, she wanted to have a “Nerf Party” and she found a lot of great ideas on Pinterest.

She and I set to work one Sunday using pallets, card board boxes, plastic shelving and paint.  Here’s what we created:

Standard targets…
She found some large, skinny boxes which we cut in half to create two standard targets.  We were able to free-hand the targets on then weigh them down with rocks in the boxes.

IMG_4443

Silhouette Target…
Okay, well it isn’t a traditional silhouette target, but it was a lot of fun for the kid.  Her son posed for this piece while we outlined him with a sharpie.  The we painted it, filled with rocks so it would stay up and DONE!

Camouflage Cover…
I had some pallets laying around but not enough.  While I was driving to her house, I looked in the back of every business I passed.  Luckily I saw a pile of pallets and other junk in the back of a music store in the area.  I stopped and asked if I could dig through their trash and they hesitantly agreed. Out of the pallets we created camouflage cover simply by rotating spots of black, brown and green spray paint.  They turned out pretty good.

Army Crawl Obstacle…
While I was at the music shop, they were also throwing out some plastic storage shelves.  We ended up using the parts to build an army crawl obstacle and spray painted it in camouflage.  The kids loved crawling through it to catch their friends.

All in all, the kids found it to be a great time and mom really only had to purchase paint.  You don’t have to spend a bunch of money to spoil your kids!

Until next time,

signature


Second Guest Room…

In May 2015 my husband and I experienced a miscarriage, specifically an ectopic pregnancy.  This was probably the most terrifying and heartbreaking experiences of my life.  I had left one of the three bedrooms in my house unfinished in the hopes it would one day be a nursery.  Knowing how long it took to get pregnant in the first place, and understanding we would have to wait 6 months to even try getting pregnant again, I couldn’t just walk by that room every day knowing it wasn’t remotely close to being a nursery. So I decided to make it over and I did so for under $500.

The Bed…
I found the antique, French Provincial head/foot board AND the antique telephone table on a Facebook local sale page for $150.

I found a brand new mattress and box spring on a local Facebook sale site for $200, but then ended up selling the box spring for $35 because it was too tall and obstructed the beauty of the head/foot boards.  I then found a bunkie board for FREE and added wooden slats (which I cut myself from scrap wood) for support.

Since I had a $50 gift card to one of my favorite places, Home Goods, I looked for bedding and I found a beautiful duvet cover and shams.  The throw pillow covers I had purchased from Etsy over a year ago (they weren’t the right color for my living room) and I simply stuffed them with leftover stuffing from the old pillow topper I took apart months ago and used in the throw pillows for the blue room (blogged about previously).

The Window…
The curtains were another find at Home Goods and they are lovely paired with the bedding.  Also, I found the curtain rod at a neighborhood yard sale for $2. Perfect!

The mirror on the left of the window…
I was thrilled to find this at Goodwill for $6.  The gold was not quite right, so I popped out the mirror, spray painted it a lighter gold and replaced the mirror.  Perfect!

Mirror

The art to the right of the window…
This is a fun story.  At the same neighborhood sale where I found the curtain rod, I saw this wall piece.  Is is a really heavy ceramic piece of a stone/creme color.  I loved it the moment I saw it but the seller wanted $25 for it and I couldn’t justify the purchase.  A few months later, the same day I found the mirror above, I saw the piece!  The same piece from the yard sale…but this time it was on sale for $9!  So I purchased it them spray painted the same color as I painted the mirror above.  What a steal!

wall art

The small shelf…
This was another Goodwill find.  I think I purchased it for about $3 and thought I would use it as a small side table rather than a shelf.  Painted it white to match the bed and installed.

shelf

DVD shelf…
This was pretty simple.  I purchased a couple of inexpensive shelf brackets from Amazon and went to work.  I cut and painted a couple pieces of pallet wood then screwed them into the brackets and installed the piece on the wall.  Further, I purchased a paintable cord hider from Amazon as well.

Photo Frames…
This took me a few months.  I purchased several photo frames from Goodwill, Facebook sale sites and Home Goods.  I made sure they were all very ornate.  It didn’t matter if they matched.  I then painted each one the same color and mounted them on the wall.  I chose cream to go with the wall so that it would look simple and not overbearing.

This is now another satisfying room to pass by.  I feel a sense of accomplishment, where before I felt emptiness.  For me it was better not to hold on to a dream, because that process could be more painful.  One day I may get to turn this space into a nursery, but for now I will enjoy it for it’s current beauty.

For you, I hope to pass along this…Just because it doesn’t go together initially, doesn’t mean it won’t compliment each other beautifully with a simple coat of paint.

Until next time,

signature

My new sewing chair…

I purchased this lovely little pink chair on a Facebook local sale site.  Unfortunately, I don’t have anything pink in my house.  So I decided to paint and reupholster it.

Now it is a lovely navy blue with white anchor symbol. Further, I covered it in the same white material as I covered the back of the throw pillows in my navy blue room (which were from a throw blanket/sheet belonging to my husband’s late grandmother).  I also used a clear vinyl material to protect it.

I love it and use it quite frequently in my sewing room.  Just because it isn’t perfect at first, doesn’t mean it can’t be perfect with a little help.

Until next time,

signature

Shadow boxes…

I’m not a really sentimental person, so when I do wish to display a memory, I want to do so in an organized yet capturing way.  Shadow boxes are a wonderful way of accomplishing this.

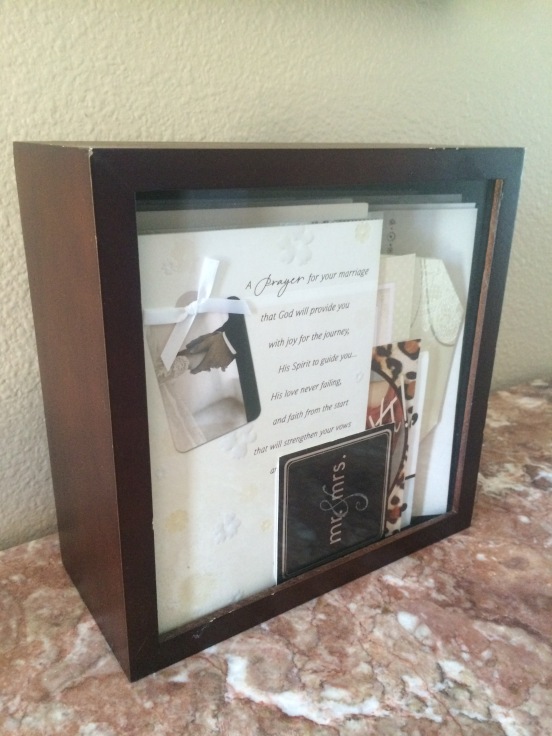
I put these together for our wedding and our friends Lauren and Daniel…

This shadow box is filled with all our wedding cards as well as other special cards.  I can open and read them anytime I want…

IMG_4284

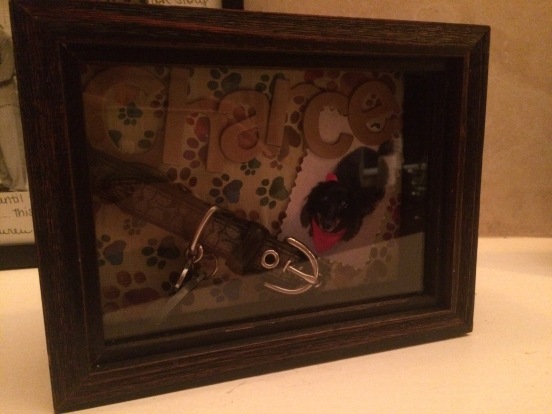
Another box I made was for my friend after the loss of his dog, Chance…

IMG_4279

This shadow box is filled with memories of my grandparents and great-aunt.  My great-aunt used to have this beautiful ceramic watering pot with a music box device which played “Oh what a beautiful morning”.  As a Child I would listen to it over and over.  Unfortunately I dropped the piece and shattered it, but i kept the musical device.  In this shadow box, I cut a hole in the back and secured the music box device in it.  I’m now able to listen to my favorite song anytime I wish.  It’s definitely a favorite piece.

Memories don’t always have to be kept in a scrapbook or a box never to be seen.  Sometimes a little creativity will keep a memory alive forever.

Until next time,

signature

Burlap Christmas Stockings…

While my husband and I were in Savannah, Georgia; we stopped in at a wonderful coffee shop called Savannah Coffee Roasters.

I was so excited to see a huge pile of real burlap coffee bean sacks stacked on pallets in the back of the shop.  They were priced at $15 each, but it was going to be worth it because I wanted so do a project with a burlap sack.  While I was pouring through the many options, a male employee approached us and asked if I had made a selection yet.  He seemed eager for me to decide, which I found odd.  Once I had, he grabbed the selected sack from my hands, put it in a bag and said “our Managers told us all to take a burlap sack for free since we had so many…so I’m giving you mine.  Enjoy!”  I was ecstatic and so thankful!

When we returned home from our wonderful trip, I started to work on my stockings. I purchased some creme colored material on clearance at Walmart, inverted all the fabric, cut it in the shape of a stocking then sewed all the edges.  Then I cuffed the top and sewed on loops of braided red and white string.

Further, I added our initials and some ornaments.  Favorite stockings ever!


Until Next Time,

signature

My new dock!

I am so fortunate to live on a pretty large pond stocked with turtles, fish, ducks, otters and gators (snakes too…but I don’t like to talk about that).  I also have a privilege of seeing Bald Eagles once in a while too!  My home was built in 1987 and the original owner happened to build boat docks by trade…therefore, he built a dock on this pond.  We are one of the very few in our neighborhood to have one and ours is grandfathered in to the HOA neighborhood rules.

The dock was built complete with two built-in benches.  We added a white table owned by my husband’s grandmother.  The table and chairs I LOVE but the gray, old, worn cushions were pretty annoying.  So one day I set to work after finding outdoor canvas fabric at Jo-Ann Fabric on sale!

I really didn’t want to spend a lot of money, fabric is expensive enough.  I knew purchasing normal pillow inserts would be really expensive but I also knew I wanted to be able to remove the covers easily for washing. SO…rather than buying pre-made pillow inserts, I purchased $3 standard pillows from Wal-Mart, cut them in half, sewed up the ends and ended up with 2 throw pillow inserts for $1.50 each.  I ended up making 12 total.

PILLOW INSERTSFurther, I used cheep egg-crate mattress toppers ($9 each), also from Wal-Mart, for the seat cushions.  I simply folded them over and cut to size.

IMG_3671The seat cushion covers were sewn together then I sewed in Velcro for easy removal.

Pillow covers vary based on how much material was available in each design.  Some I made in a printed front with solid back and others I made solid with a strip of the printed material down the center.

pillow coversI then re-covered the chair cushions with this beautiful material and finished them with clear vinyl fabric to keep them clean and dry.

chairs

I absolutely LOVE the finished product!

finalDoesn’t just make you want to come over and sip a glass of wine?

Until next time ~
signature

“The Taylor Project” (Episode 6): The final product…

Well here it is! We wrapped up this fun project and delivered it at the beginning of September.  Taylor now has a great, “Woodland” themed Bachelorette pad designed just for her.

The sofa was the only piece of furniture she purchased new. By the way Big Lots has some great furniture.  Pictured here you see the ottomans which double as extra seating AND a coffee table for Taylor.  You see the wicker tray on which she sets drinks and food.  The wood wall art was made from the same re-claimed wood as the ottoman center and I look forward to seeing it once she uses her wood burner to inscribe her favorite quote.  The curtains are simply hung on the existing vertical blinds track using gator clips from IKEA.
IMG_4239

IMG_4244

IMG_4243

The bathroom is tiny (just a shower and toilet) but it is complete with a woodland-y shower curtain found at Big Lots and the re-purposed trashcan you saw two weeks ago.

IMG_4231

A friend of the family found the wooden dresser for $5 at a yard sale and it looks great in the space with the leaf lamps I found online and the other two curtains.  We used more hooks to affix the curtains to existing blinds rather than buying a rod.

IMG_4229

The wine rack is hung above her bar and is the first piece anyone sees when they walk in the front door.

IMG_4219

And finally…the bed and canvas art….my favorite pieces in the apartment  It was almost a shame to add a mattress and cover that beautiful wood, but all of it is pretty breathtaking and you can still see the top wood.

IMG_4222

The re-purposed fence hinges worked well to connect the two halfs…plus it looks pretty nice.

IMG_4223

Oh and I added rope lighting underneath to add a little extra “sexy-ness”

IMG_4224

The drawers are HUGE and have faux faces made of pallet wood and handles made from branches.  Taylor loves having all the storage.

IMG_4225

LOVE LOVE LOVE! Oh, I found the mattress brand new (really brand new) on a Facebook for Sale site for $80.  I also bought these tan sheets (and some dark brown ones) at Big Lots for $37 total.

IMG_4226

I hung the headboard on the wall using heavy duty picture hanging hardware and Gorilla Hooks. We also stained the wood and just kept the rough spots to create depth.  You saw how I made the canvas art, but it’s pretty wonderful seeing them hung over the bed.

IMG_4227

Well that’s it!  I’m pretty proud of this project and best of all Taylor is in LOVE with her new place.  She went from sleeping on a mattress on the floor and having no furniture, to having a complete home to be proud of.

Until next time ~

signature

“The Taylor Project” (Episode 5): Decoration Re-Assignment – PART 2…

As I continue to work on the bed project (probably the largest project I have ever taken on), I use some of my time completing “quick wins” to enlist the feeling of progress.  These four projects certainly took time but the physical energy required was negligible.

Wine Rack
As you saw in my very first blog post, I have made a few of these wine racks.  For this one I used a combination of reclaimed wood (taken directly from the original box spring) and new “filler wood.  I mount these pieces on a 3/4 inch piece of plywood with both heavy duty glue and screws. I then mounted sturdy picture hanging hardware to the back and stained the wood with a dark walnut stain.  Once dry, I hammered heavy duty staple nails to attach the bed springs.

wine rack

White Board
I wanted to give Taylor something fun for her to make grocery lists or reminders.  You can actually turn any glass surface into a white board.  We had a nice wooden frame with a print we did not plan to use any further in our home.  I removed the artwork and painted the cardboard backing cream with paint I already had from painting my own home. I then mixed navy blue and cream paint samples and painted the matte border blue to match our color scheme.  After cleaning up the glass and allowing the paint to dry, I replaced all the pieces and had a white board!  You can use any dry erase or wet erase marker on this and erase it away easily.  Sorry I didn’t have any on hand to demonstrate.

white board progression

Wood Plank Wall Art
This piece will be finished by Taylor. She wanted a large piece of wooden artwork to hang behind her sofa which she plans to burn her favorite quote into.  Since I had scrap wood leftover from several projects, I simply arranged them, cut them with a miter saw and mounted them to 4 vertical pieces of 2×4.  I then added heavy duty picture hanging hardware.  I really can’t wait to see what else she does with it.

plank wall art

Canvas Wall Art
This piece was a lot of fun.  Taylor was given two used pieces of canvas prints which were not “woodland” themed in the least.  The family friend who gave it to her said “tell Shannon to do something creative with them”.  This gave me permission to change them completely.  So I painted them a deep cream color by mixing several shades of paint together.  I did have to use Kilz Primer and a few coats on front AND back as the design kept bleeding through.  I then used brown paint I already had and some tiny craft brushes to paint the tree free-hand.  I am not an artist, but I remembered the basic rules for drawing a tree from elementary school…it’s basically a bunch of “Vs” over and over.  I filled in the trunk using messy long strokes to give it some texture.  The wording is free-handed as well using the same light blue paint mixture as I used in the white board piece.

canvas progression

Next week is the final episode of “The Taylor Project” where you will see the completed bed and how all these pieces fit together to create Taylor’s new home.

Until next time ~

signature